Sunday, June 8, 2014

White Cake - Vanilla Cupcakes


I wanted to try this recipe because its titled "The Perfect White Cake" and I've had trouble in the past with vanilla cake recipes coming out perfect. They did indeed bake up quite perfect and they tasted like cake! Not like pancakes! Perfect! It's a very stark white cake, using only egg whites, so if you like white cake to be alittle richer like I do, I would keep in two of the egg yolks, like this recipe - just don't add the oreos. But overall, these were great, and the buttercream was tasty too.  


White Cake - Vanilla Cupcakes
Adapted from: I am Baker
Yield: 21 cupcakes


2 1/4 cups cake flour
1 cup milk at room temperature*
6 large egg whites at room temperature*
2 teaspoons almond extract
1 teaspoon vanilla extract
1 3/4 cups granulated sugar
4 teaspoons baking powder
1 teaspoon table salt
1 1/2 sticks unsalted butter, softened but still cold

Directions
Heat oven to 350 degrees. Prepare cupcake pan with liners or grease two 8-inch cake pans.

Make sure milk and eggs are room temperature. Pour milk, egg whites, and extracts into medium bowl and mix with fork until blended.

Mix cake flour, sugar, baking powder, and salt in bowl of electric mixer at slow speed. Add butter, cut into cubes and continue beating on low for about 1-2 minutes.

Add all but 1/2 cup of milk mixture to flour mixture and beat at medium speed for 1 1/2 minutes. Add remaining 1/2 cup of milk mixture and beat for about 1 minute. Pour batter evenly between two prepared cake pans.

Bake until toothpick inserted in the center comes out clean. It will depend on if you filled the cupcake liners half way or 2/3 or 3/4 of the way, start out with 15-20 minutes and then check on them with a toothpick. 27 to 30 minutes for cake pans.

Allow cake to cool to room temperature.

Strawberry Cream Cheese Buttercream

1 stick butter, softened
8 oz. cream cheese, softened

pinch of salt
2 1/2 cups powdered sugar
1 teaspoon vanilla extract
1 cup strawberries, blended to make about 1/2 cup puree

Directions
To make the frosting, beat the butter and cream cheese until light and fluffy. Add the salt and powdered sugar, until combined. Add the vanilla and strawberry puree and beat until light and fluffy.

Saturday, May 31, 2014

Mini Nutella Cheesecakes


I've been wanting to buy a mini springform pan, maybe a 6 or 7 inch one from amazon but then came across these 4.75 inch springform pans at walmart. They are alot smaller, but they were too cute to pass up. So I made these little nutella cheesecakes with them. The cheesecake came out perfect, so creamy and smooth. I topped each one with a fluffy nutella mousse, which was my sister in law's favorite part. 


Mini Nutella Cheesecakes
Adapted from: The Baker Upstairs
Yield: 4 mini cheesecakes (4.75" springform pans) OR 20 regular sized cupcakes


Crust
3/4 cup graham cracker crumbs (process graham crackers in a blender)
3 tablespoons powdered sugar
3 tablespoons cocoa powder
4 tablespoons butter, melted

Directions
Mix all ingredients together and press into the bottom of four 4.75 inch springform pans. Or line cupcake tins with 20 paper or foil liners and press about a teaspoon of crumbs into bottom of liners. Set aside.

Cheesecake
16 ounces cream cheese, softened
1/2 cup sugar
2 large eggs
1/4 cup heavy cream
1/4 cup sour cream
1 teaspoon vanilla
3/4 cup Nutella (I used 1/2 cup but I would suggest adding alittle more for taste)
Fresh raspberries, optional, to garnish


Directions
Preheat oven to 325 degrees F. 

In the bowl of a stand mixer, blend sugar and cream cheese until smooth. Beat in eggs, one at a time. Then add heavy cream, sour cream, and vanilla, and mix until smooth. Blend in nutella until just combined. 

Divide the filling evenly between the mini springform pans or cupcake liners, filling nearly to the top (about 1/2 inch to the top). Tap lightly on the counter to release any trapped air. Bake 30 minutes for mini spring form pans and 20 minutes for the cupcakes. Cheesecake will be just slightly jiggly in the center. Open oven door and turn off the oven. Allow to slowly cool inside oven. Then remove from oven and let cool to room temperature. When fully cool, cover with plastic wrap and chill in refrigerator for several hours. Keep in the refrigerator.


Nutella Mousse
Adapted from: Pretty Simple Sweet

1/2 cup Nutella, soft at room temperature
1 cup heavy whipping cream, cold

Directions
In a stand mixer bowl with whisk attachment, beat the heavy cream just until stiff peaks form, do not over beat. Add 2 tablespoons of nutella and whisk. Add the rest of the nutella and gently whisk for a few seconds and then fold with a rubber spatula until combined and smooth.

Chill the mousse to set for at least 2 hours.

Wednesday, May 7, 2014

Chocolate Chip Cookie Cake


What can I say? There are no words for Nadijah. She's one of the best people I've ever known, and my heart will fill a void when I realize we won't be hanging out on weekends anymore. We are so proud of her, tabarakAllah, and may she feel ease and happiness in this new chapter of her life. Congratulations!!!!


These were everything a good cookie cake should be. Chewy, soft, alittle under-baked in the middle, and golden brown crispy on top..


You can't have cookie cake without frosting. But better than artificial, sickeningly sweet canned frosting is this homemade chocolate buttercream. It was smooth and luscious and a perfect crown to this celebratory cake.


I'm planning to make this again for Yusif and Naven, thats how good it was. They love cookies so I'm sure they will enjoy this. And this was one the easiest recipes out there. I like how there's no extra wait for these. You don't have to wait to chill the cookie dough and you don't have to make them a day early.


Chocolate Chip Cookie Cake
Adapted from: Sally's Baking Addiction

Ingredients
3/4 cup unsalted butter, softened to room temperature
1 cup light brown sugar
1/4 cup sugar
1 large egg + 1 egg yolk, room temperature*
2 teaspoons vanilla extract
2 cups all-purpose flour (careful not to over measure)
2 teaspoons cornstarch (cornflour)
1 teaspoon baking soda
1/2 teaspoon salt
1 and 1/2 cup semi-sweet chocolate chips or chunks (reserve 1/4 cup)

Directions
Preheat oven to 350 F degrees. Grease with shortening a 9-inch pie dish or cake pan or use a nonstick spray. Set aside.

In a large bowl using a hand-held mixer or stand mixer fitted with paddle attachment, beat the butter for 1 minute on medium speed until completely smooth and creamy. Add the sugars and beat on medium speed until creamy, about 1 minute. Mix in eggs and vanilla on medium-high speed until combined. Scrape down the sides and bottom of the bowl as needed.

In a separate bowl, whisk together flour, cornstarch, baking soda and salt. On low speed, slowly mix into the wet ingredients until combined. The cookie dough will be quite thick. Add 1 and 1/4 cups chocolate chips and mix for about 5 seconds until evenly disbursed.

Press the cookie dough evenly into the prepared pan. Sprinkle reserved 1/4 cup of chocolate chips on top and lightly press in. Cover with aluminum foil to avoid heavy browning of the cookie cake. Bake for 20 minutes. Then, remove foil and bake for an additional 10 minutes or until the cake is lightly golden brown. Remove from the oven and set the pan on a wire rack to cool completely. Once cooled, use a sharp knife or metal spatula to loosen the sides of the cookie cake from the pan and transfer to a serving dish. (Or use can serve directly from the pan.)

Milk Chocolate Buttercream
1 and 3/4 cups confectioners' sugar
1/4 cup unsweetened cocoa powder
1/2 cup unsalted butter, softened to room temperature
2 Tablespoons heavy cream or half-and-half*
1 teaspoon vanilla extract
pinch of salt

Directions
Sift or whisk together the confectioners' sugar and cocoa powder to assure there are no lumps. Set aside. With a handheld or stand mixer fitted with a paddle attachment, beat the butter on medium speed until creamy - about 2 minutes. Gradually add the sifted sugar/cocoa powder alternately with the heavy cream and vanilla. Beat on low speed after each addition. Once all added, beat on high speed until creamy and combined for at least 2 minutes. Add a pinch of salt.

Decorate the cooled cookie cake with frosting with a Wilton 1M piping tip. Cookie cake remains fresh covered tightly at room temperature for up to 3 days.

*I prefer room temperature eggs for my cookie cake. Room temperature eggs incorporate evenly into your cookie dough – guaranteeing a uniform texture in each bite of the cookie cake. Simply set out the eggs when you set out the butter to come to room temperature. If you forget to set out your eggs, no worries. Place them into a bowl of warm water for 5 minutes, then use.


*For the frosting, heavy cream or half-and-half will give the creamiest texture. You may use milk instead, keeping in mind the frosting won't be as creamy or whipped.

Monday, April 28, 2014

Gooey Messy Brownies


I made these for Musa's first visit to our home. Welcome, baby!


We ate these with Breyer's tiramisu gelato and fresh strawberries. The slight coffee flavor from the gelato, the bittersweet chocolate from the brownies, and summerly sweet berries all paired so well together.


This brownie recipe is called, "The Best Brownies in the World." Which is a pretty big claim! They were delicious, but I'm still on the hunt for the very best. And the blogger said I would be if I want fudgy, cakey brownies, which is exactly what I'm looking for. These on the other hand, are gooey messy brownies. They're great with ice cream or gelato though!


Maybe I should stop using the same bittersweet chocolate (ghiradelli brand) when testing brownie recipes. Because I think maybe what my taste buds are looking for are brownies that are made with dark chocolate and dark cocoa and maybe dark semi-sweet chocolate chips. But I keep getting similar results in flavor and texture with the ghiradelli chocolate. Similar, but I would say Good Housekeeping's brownies were alittle better than these.


I like to store my brownies in a container with a lid as soon as they are cooled. This keeps them moist, chewy, and soft. 


Gooey Messy Brownies
Adapted from: Cravings of a Lunatic via Tasty Eats at Home
Yield: 12 brownies


Ingredients
8 tablespoons of butter
2 ounces unsweetened chocolate
1 cup sugar
2 eggs. beaten
1 teaspoon vanilla
½ cup semi-sweet chocolate chips (I used mini)
¼ cup flour¼ cup cocoa powder
¼ teaspoon salt

Directions
Preheat oven to 325˚F. Line 8x8 inch pan with parchment paper.

Melt the butter and unsweetened chocolate together over low heat in a medium saucepan. Stir with a wooden spoon or whisk. Remove from heat and add the sugar. Stir well. Add eggs and vanilla, stirring until it’s smooth. Add chocolate chips, flour, cocoa powder, and vanilla salt. Stir until well blended.

Pour into pan and place in oven. I always tap my pan to get out any bubbles and make it even.
Bake for 35-45 minutes, toothpick inserted should come out clean when done. Remove and cool on a rack.

Wednesday, April 2, 2014

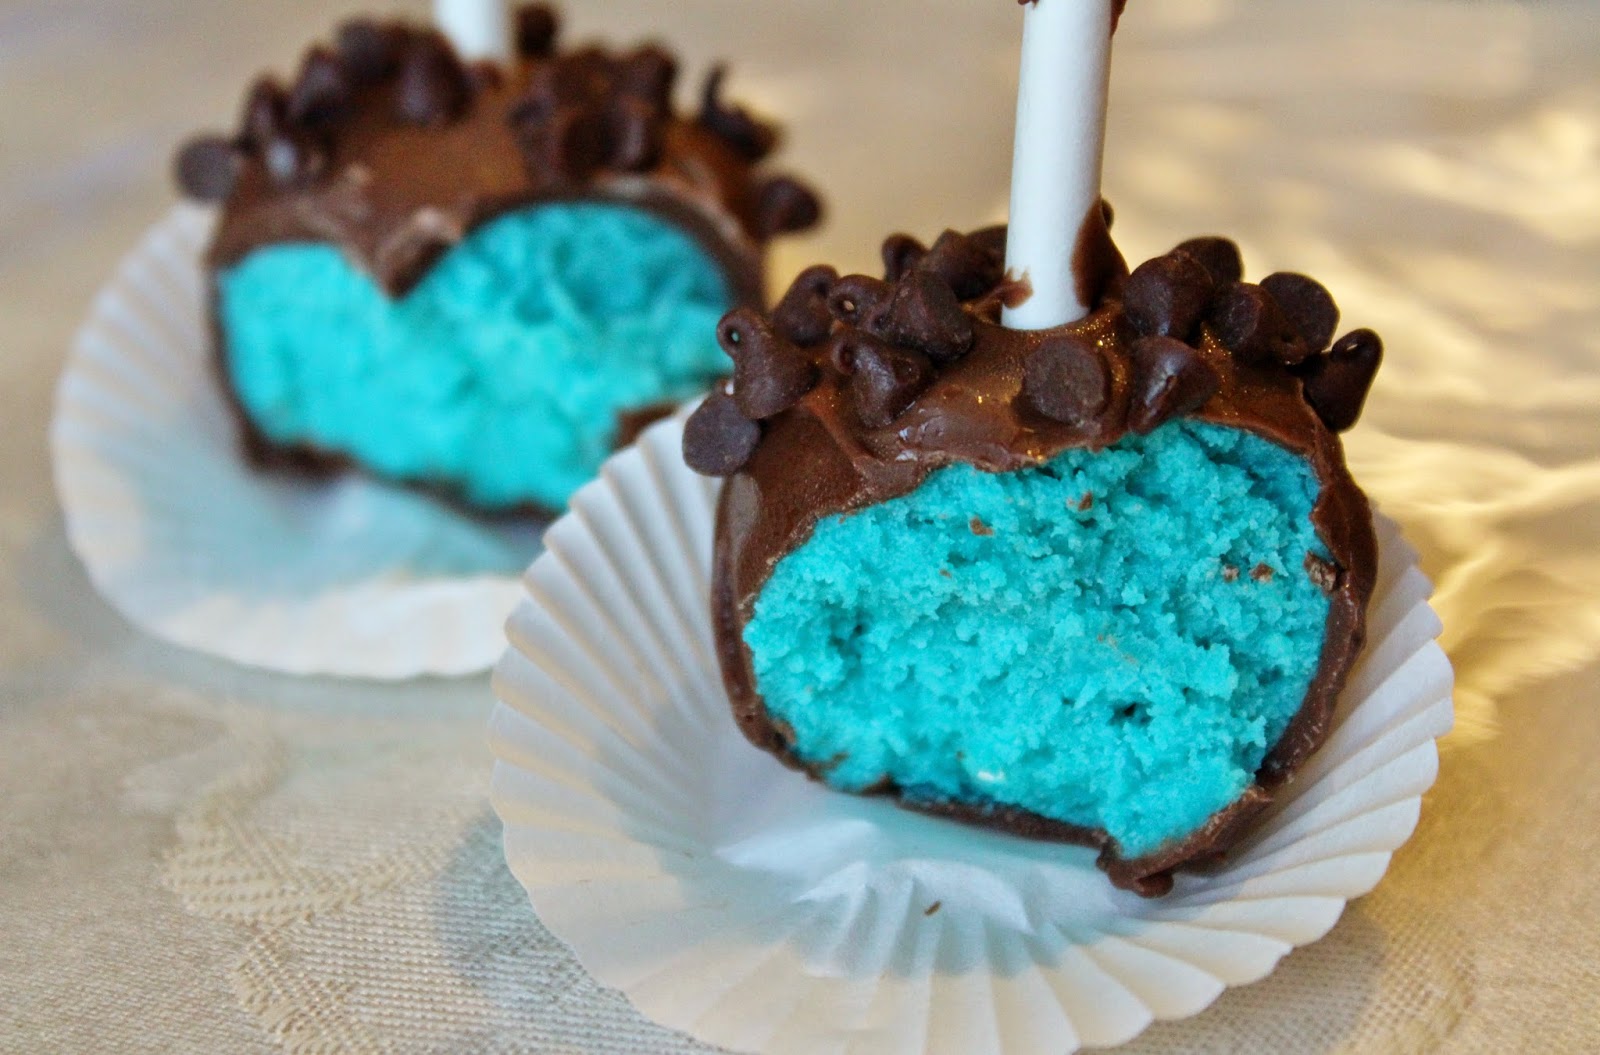
Blue Velvet Cake Pops - Baby Shower Favors!


Today I am the proud auntie of Musa, born at 10:45 AM, 7 pounds and 19 3/4 inches long. He already has so many that love him, mA. I brought these to the hospital to share. Ibraheem (18 months now!) doesn't usually like cake, but he devoured one. I think he just liked eating something off a stick. These are my first real cake pops. I have only made them with oreos before. 


Make sure you use chocolate bark that tastes good. I thought I didn't really like cake pops in the past, but actually I just don't like that artificial waxy candy coating. I used Wilton Candy Melts in Light Cocoa flavor, which tastes like real chocolate but this formula hardens beautifully.


I'm thinking I could make these for a friend's baby shower next month. She's expecting a boy and I love that vibrant blue color! These would be cute shower favors.


I was originally inspired by this recipe to make these cake pops. But I read a few blogs and most mentioned to just make a boxed cake mix. Make it easy on yourself since cake pops are time consuming, and you are just going to crumble it up anyway so you don't need a cake that comes out with a gorgeous texture.


Speaking of babies, I also wanted to share the blanket I crocheted for my nephew. Pinterest inspired, and made with love. The center grey color is a basket weave stitch and the edges have a cute shell border.


Four more tips: 1) Be sure to dip the sticks in the chocolate before inserting into the cake balls and then freeze until firm so they are secure. This helps prevent the stick from falling out when you dip them. 


2) Melt the chocolate bark in smaller portions, about 6-8 ounces at a time, since its easier to work with when its hot.


3) Don't add too much frosting to the cake! Less is more. It should still look alittle crumbly, but moist enough to roll. You want these to taste like you're eating fluffy cake when you bite into them, not like a soggy mess.


4) Lastly, don't make the cake pops so big. They get heavy and could fall off the stick when you are dipping them. Alittle larger than a tablespoon should be good.The picture above is a good size, it fits into the mini cupcake liner. The picture below shows a huge cake pop, flattening the mini cupcake liner.


Blue Velvet Cake Pops
Recipe adapted from Bakerella
Yield: about 40 cake pops


Ingredients
1 box blue velvet cake mix (or your favorite cake flavor)
1 can (16 oz.) cream cheese frosting 
24 oz. of chocolate bark (I used 2 packages of Wilton Candy Melts in Light Cocoa flavor)
mini semi-sweet chocolate chips

parchment or wax paper
40 lollipop sticks, optional (you could just do these as cake balls instead of pops)
40 mini cupcake liners, optional
Disposable rubber medical/exam gloves (non-powder)


Directions
Bake the cake as directed on box for a 13 X 9 cake. After cake is cooked and cooled completely, crumble into large bowl. Add 5 tablespoons of cream cheese frosting and while wearing gloves, mix thoroughly with your hands. Mixture should still look alittle crumbly but moist enough to roll into balls. You can add more frosting if needed, but don't add too much. Roll mixture into quarter size balls and freeze for 20-30 minutes until firm.

Melt 8 oz. of chocolate bark in microwave per directions on package. I melt the chocolate bark in three small portions at a time because it starts to cool and thicken. It’s easier to work with when it’s hot. Dip lollipop stick into chocolate and then insert into cake ball. Freeze for another 10 minutes so that the stick is firmly secure. 

Dip cake pops in chocolate and lay on wax paper until firm. You could use a spoon to roll cake pop in to tap off extra chocolate. Sprinkle with mini chocolate chips.

Friday, March 28, 2014

No Bake Peanut Butter Oreo Truffles


I made these for a great night with the girls to see our Zignat. Thanks for visiting us! Wish you were still in SA because we love seeing you!


I used Wilton Peanut Butter Candy melts which were really good. They taste natural and very peanut buttery. How can you go wrong with this flavor combination.


No Bake Peanut Butter Oreo Truffles

Ingredients
16 oz. Peanut Butter Oreos
5 oz. cream cheese, softened to room temperature (use 3 oz. if making cake pops)
2 tbsp. peanut butter, optional (use if you buy regular oreos)

12 oz. bag of Wilton Peanut Butter Candy Melts
30 lollipop sticks, optional (you could just do these as cake balls instead of pops)
mini chocolate chips or chocolate sprinkles, optional

mini cupcake liners, optional

Directions
Dump the entire package of oreos in your food processor. Process until they are fine crumbs. This is optional but if you want, add the peanut butter. Then add the softened cream cheese and blend until its all mixed together. 

Roll into balls the size of a tablespoon and place on a plate lined with parchment paper. Stick them in the freezer for 20 minutes. 

Melt your candy coating in microwave according to instructions on bag. Take the end of the lolipop stick and dip it into the melted candy coating, about 1/4 inch up the stick. Insert stick into the center of a truffle, be careful not to go all the way through the other side. If not making into cake pops, simply dip them into the chocolate and use a spoon to tap off the extra. Return truffles to the freezer for about 5 more minutes so that the coating can firm up.

Put some of your melted candy coating in a short cup or mug and dip the truffle pop to coat all sides. Garnish with mini chocolate chips or sprinkles on top or on all sides and allow to set up on a plate lined with parchment paper or place onto mini cupcake liner.

Refrigerate left overs.
 
Blog Installation and Coding by Designs by Linds 2011