Showing posts with label Mousse. Show all posts

Saturday, May 31, 2014

Mini Nutella Cheesecakes


I've been wanting to buy a mini springform pan, maybe a 6 or 7 inch one from amazon but then came across these 4.75 inch springform pans at walmart. They are alot smaller, but they were too cute to pass up. So I made these little nutella cheesecakes with them. The cheesecake came out perfect, so creamy and smooth. I topped each one with a fluffy nutella mousse, which was my sister in law's favorite part. 


Mini Nutella Cheesecakes
Adapted from: The Baker Upstairs
Yield: 4 mini cheesecakes (4.75" springform pans) OR 20 regular sized cupcakes


Crust
3/4 cup graham cracker crumbs (process graham crackers in a blender)
3 tablespoons powdered sugar
3 tablespoons cocoa powder
4 tablespoons butter, melted

Directions
Mix all ingredients together and press into the bottom of four 4.75 inch springform pans. Or line cupcake tins with 20 paper or foil liners and press about a teaspoon of crumbs into bottom of liners. Set aside.

Cheesecake
16 ounces cream cheese, softened
1/2 cup sugar
2 large eggs
1/4 cup heavy cream
1/4 cup sour cream
1 teaspoon vanilla
3/4 cup Nutella (I used 1/2 cup but I would suggest adding alittle more for taste)
Fresh raspberries, optional, to garnish


Directions
Preheat oven to 325 degrees F. 

In the bowl of a stand mixer, blend sugar and cream cheese until smooth. Beat in eggs, one at a time. Then add heavy cream, sour cream, and vanilla, and mix until smooth. Blend in nutella until just combined. 

Divide the filling evenly between the mini springform pans or cupcake liners, filling nearly to the top (about 1/2 inch to the top). Tap lightly on the counter to release any trapped air. Bake 30 minutes for mini spring form pans and 20 minutes for the cupcakes. Cheesecake will be just slightly jiggly in the center. Open oven door and turn off the oven. Allow to slowly cool inside oven. Then remove from oven and let cool to room temperature. When fully cool, cover with plastic wrap and chill in refrigerator for several hours. Keep in the refrigerator.


Nutella Mousse
Adapted from: Pretty Simple Sweet

1/2 cup Nutella, soft at room temperature
1 cup heavy whipping cream, cold

Directions
In a stand mixer bowl with whisk attachment, beat the heavy cream just until stiff peaks form, do not over beat. Add 2 tablespoons of nutella and whisk. Add the rest of the nutella and gently whisk for a few seconds and then fold with a rubber spatula until combined and smooth.

Chill the mousse to set for at least 2 hours.

Monday, January 21, 2013

Dark Chocolate Mousse Parfaits


The inspiration for these came from this pin, which does include a recipe but I decided to use Annie's Eats Dark Chocolate Cake and the Neely's Chocolate Mousse. I topped it with Pioneer Woman's Chocolate Curls


I've made the mousse before, but this time I used a bag of dark chocolate Lindt truffles. I wanted to use high quality chocolate so it would be velvety and heavenly. 


Unfortunately, I over-whipped the cream so it was slightly curdled. Darn it. Whipping cream is like baking cheesecakes and cookies. There is such a fine line between done and over done.


Oh well, texture was ugly but still tasted okay I guess. Kind of disappointing. Nora, don't ever over whip the cream again!


I would use two bags of Lindt (5.1 oz each) because I think the centers are really light and dark chocolate has less fat. 


Also, strain the egg yolk mixture after it is done cooking, rather than after adding the chocolate.


The cake was very dark and pretty. I put it in a 13x9 inch pan and baked at 350 degrees for 40 minutes. It made alot of cake, we have left overs. 


I added only one cup coffee and 3/4 cup buttermilk to the cake batter. I didn't want to water it down too much, and it came out great. 


Actually, I'd say this is a great double for my favorite cake at HEB - the Ivory and Ebony cake. It's a dark chocolate cake and they fill it with white chocolate ganache. This cake would pair wonderfully with a white chocolate mousse.


I only needed to make 6 parfaits but after making the first glass, I realized there was not going to be enough mousse. Thankfully we had some chocolate pudding cups, so I had to add it for more substance. I ate the one without the pudding, but everyone else loved theirs! 


I had the most fun making the chocolate curls. Haha, which is just the garnish but actually they get soft in the parfait and add extra flavor! 


Pioneer Woman has step by step photos on how to make the curls and helpful tips. I wanted to use dark chocolate but opted for semi-sweet because I wasn't sure if dark chocolate would curl. 


My only advice with the chocolate curls: spread the chocolate very very thin! Ree said that too, but I didn't know how thin is thin. I would say paper thin, you should almost see the pan. It curled so much easier than the thicker areas.  


These are my first pictures with my Canon! I know I'm not using it right. I'm sure there is a way to get rid of the glare on the glass. And I suck at taking photos!


Dark Chocolate Cake
Adapted from: Annie's Eats

2¼ cups all-purpose flour
2¼ cups sugar
1 cup plus 2 tablespoons dark unsweetened cocoa powder
2¼ tsp. baking soda
1½ tsp. baking powder
1½ tsp. salt
6 tbsp. vegetable oil
1 cup plus 2 tbsp. buttermilk
1 cup plus 2 tbsp. brewed coffee*
3 large eggs, at room temperature
1 tbsp. vanilla extract

Directions
Heat oven to 350˚ F.  Grease and flour the edges of three 8-inch baking pans, shaking out the excess. Line the bottoms with rounds of parchment paper.

In the bowl of an electric mixer, combine the flour, sugar, cocoa powder, baking soda, baking powder, and salt.  Mix on low speed to blend.  Add the vegetable oil, buttermilk, coffee, eggs, and vanilla to the bowl and mix on low speed until well blended and completely incorporated.

Divide the batter evenly between the prepared pans.  Bake 20-25 minutes, or until a toothpick inserted in the center comes out clean.  Let the cakes cool in the pans about 15 minutes, then invert onto a wire rack and allow to cool completely.  Remove the parchment paper.

Dark Chocolate Mousse
Adapted from: The Neely's

8 ounces semisweet chocolate, chopped fine
4 large egg yolks
6 tablespoons sugar
1 3/4 cups heavy cream
2 teaspoons vanilla extract
Pinch of salt

Directions
Melt the chocolate by adding to a bowl placed over simmering water and stirring until melted and smooth. Remove from the heat.

Whisk together the egg yolks, 4 tablespoons sugar, 3/4 cup heavy cream and a pinch of salt in a medium 2-quart curved bottom saucepan. Place over medium heat and stir constantly until the mixture is thick, about 3 minutes. Whisk in the chocolate and vanilla. Strain the mixture into a large bowl using a fine mesh sieve and place in the refrigerator until chilled, at least 30 minutes.

Beat the remaining 1 cup heavy cream and remaining 2 tablespoons of sugar until stiff peaks form. Gently fold the whipped cream into the chilled chocolate. Divide the mousse evenly among 4 individual serving dishes and cover with plastic wrap. Place in the refrigerator to chill for at least one hour. Serve with shaved chocolate.

Chocolate Curls
Adapted from: The Pioneer Woman

3 oz. semi sweet chocolate chips or baking chocolate
1 tablespoon crisco shortening

Directions
Place chocolate and shortening into a microwave-safe bowl and heat for 30-45 seconds until shortening is melted and hot. Stir until combined.

Pour onto a cookie sheet or a completely flat surface and spread out very thin, almost paper thin to where you can see the pan through the chocolate. This will make for much better curls. If its too thick, it won't curl.

Place in freezer for three minutes.

Using a metal spatula, turned upside down, begin to scrape the chocolate to form a curl. If the chocolate breaks, it is too cold. Wait a minute or two and then try again. When the chocolate is just the right temperature, it’ll curl instead of break.

Important: as soon as possible, transfer the curls to a cold pan or plate, then stick them in the freezer to harden. Store in the freezer in a Ziploc bag until you need them. Use them to adorn pies, cakes, or platters of fruit.

Sunday, July 24, 2011

Lemon Mousse with Pound Cake and Berries


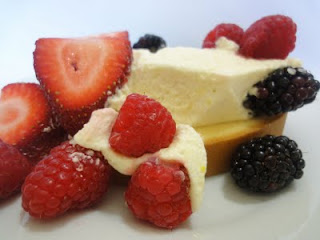
I revisited this luscious lemon mousse recipe for Aunt Jenan's visit. This time I paired it with Sara Lee pound cake and fresh berries.


While cooking the lemon curd over a double broiler, we also had potatoes roasting in the oven and risotto simmering away on the stove. I think the extra heat caused some of my egg whites to fry. I kept stirring constantly the whole 12 minutes, and then tasted it after it thickened. It was okay, I think the lemon zest saved the flavor. If it was vanilla, it might have tasted eggy. So I poured the curd into a sieve to take out those scrambled egg whites and then it was smooth again.


I do like this mousse with the whipped egg whites, but just to prevent raw egg consumption, I added the original cup of unsweetened whipped cream plus one more cup of sweetened whipped cream to substitute the whipped egg whites- and I think it actually comes out even better.


Awesome tip: Line a loaf pan with plastic wrap and make sure the edges come out enough on all sides so that you can lift the plastic out later. Pour the mousse into the loaf pan. Cover the top with the extra plastic hanging over the sides and refrigerate at least 30 minutes. Later, you can take the mousse out of the loaf pan by lifting the plastic. It makes it very easy to slice perfect sized wedges of mousse, especially since I served this with pound cake that was also in a loaf pan.

Another tip: after washing your berries, sprinkle alittle sugar over your whole and sliced strawberries. After about 30 minutes, the strawberries will get juicier and sweeter - and taste naturally ripe.


Lemon Mousse
Adapted from: Ina Garten

3 extra-large whole eggs
3 extra-large eggs, separate the yolks and whites
1 cup plus 2 tablespoons sugar
2 teaspoons grated lemon zest
1/2 cup freshly squeezed lemon juice (4 lemons)
Kosher salt
1 cup heavy cream
1/2 cup good bottled lemon curd, at room temperature
Sliced lemon, for garnish

Directions
In a large heat-proof bowl, whisk together the 3 whole eggs, 3 egg yolks, 1 cup sugar, the lemon zest, lemon juice, and a pinch of salt. Place the bowl over a pan of simmering water and cook, stirring constantly with a wooden spoon, for about 10 to 12 minutes until the mixture is thick like pudding. (I change to a whisk when the mixture starts to get thick.) Take off the heat and set aside for 15 minutes. Cover with plastic wrap directly on the surface and refrigerate for 1 to 2 hours, until completely chilled.

Place half the egg whites and a pinch of salt in the bowl of an electric mixer fitted with the whisk attachment. Beat on high speed. Add the remaining 2 tablespoons sugar and continue to beat until the whites are stiff and shiny. Carefully fold the beaten whites into the cold lemon mixture with a rubber spatula. Place the cream in the same bowl of the electric mixer fitted with the whisk attachment (no need to clean the bowl) and beat on high speed until the cream forms stiff peaks. Carefully fold the whipped cream into the lemon mixture. Fold in the lemon curd, and pour into a 7-inch-diameter, 3-inch-deep souffle dish. Decorate with sweetened whipped cream and lemon slices that have been cut into quarters. Chill and serve cold.

Friday, July 1, 2011

Paula Deen's Banana Pudding


I've watched Paula make this but it wasn't until I saw Bake or Break's photos, as usual, that I had to save it under my favorites tab. Its been long over due for testing so I finally made it this week.

Actually, I've been wanting to make this for probably about a year and then I went to a house warming for my brother and Naven. She made a scrumptious fruit trifle with pudding that had cream cheese, sweetened condensed milk, and whipped cream.


This recipe is very similar. Except the title is misleading. The pudding isn't banana flavored... and it's more like mousse! It's dense, thick, and keeps its shape perfectly, and the only reason you'd call it pudding is because its so rich. I actually can't eat that much of it because so. It doesn't have banana flavor because its made with the french vanilla pudding mix but I would imagine this would be amazing in chocolate, banana, lemon - any flavor! I added some blackberries to my piece - fresh fruit really lightens it up.


Be sure to open both bags of cookies and check them out first. I bought two bags of Chessman cookies, and to my horror they were all crushed, save only 8 cookies from each bag. So thankfully taking pretty pictures was still possible. I just had to put those ugly cookies on the bottom. I only used 4 bananas because it looked like they already filled the dish, even when I neatly placed them around the edge so outsiders can drool when looking through the glass pan.


I have never used my kitchen aid mixer to whip up instant pudding before. It came out so much thicker than when I used to mix by hand. Use whole milk too!

I read the recipe wrong and only bought 8 ounces of whipped cream but it was fine. I guess it would have been a bit more airy. But, I liked how thick it was. Extremely easy, no bake recipe. Can easily serve 20.


PLEASE READ: the recipe says to add the whipped cream to the cream cheese and then add the pudding last. Thats wrong. If you watch Paula's video, (and just from common knowledge if you're a foodie) she blends the cream cheese and sweetened condensed milk together, then adds the pudding, and lastly folds in the whipped cream.

**Edit 8-10-11: Made this recipe again for a girls iftar, but with chocolate pudding mix and topped it off with strawberries, blueberries, and raspberries! It was like chocolate mousse! Without raw eggs - awesome! The only thing I would suggest is to add the berries right before serving. I did it the night before and fridged it. The next night, the mousse was more liquidy because the fruit released water. Still tasty though. I'm calling myself stupid right now for not taking any pictures.


Paula Deen's Banana Pudding
Adapted from: Paula Deen

2 bags Pepperidge Farm Chessmen cookies
6 to 8 bananas, sliced
2 cups milk
1 (5-ounce) box instant French vanilla pudding
1 (8-ounce) package cream cheese, softened
1 (14-ounce) can sweetened condensed milk
1 (12-ounce) container frozen whipped topping thawed, or equal amount sweetened whipped cream

Directions
Line the bottom of a 13 by 9 by 2-inch dish with 1 bag of cookies and layer bananas on top.

In a bowl, combine the milk and pudding mix and blend well using a handheld electric mixer. Using another bowl, combine the cream cheese and condensed milk together and mix until smooth. Add the cream cheese mixture to the pudding mixture and stir until well blended. Fold in the whipped topping into the cream cheese mixture. Pour the mixture over the cookies and bananas and cover with the remaining cookies. Refrigerate several hours before serving.


Thursday, December 16, 2010

Lemon Mousse

I made this mousse to top off my lemon raspberry cream cheesecake. The first try I followed the recipe exactly- and it was very good. When making mousse, you have to hope it’s going to set up, keep its shape, but still be smooth and soft. It was. The lemon was perfect too- not too tart, great balance of sweetness and flavor. The second try, I wanted to omit the whipped egg whites. Because they are raw and I was sharing this with guests so I didn’t want anyone to get a tummy ache. So I replaced the whipped egg whites with sweetened whipped cream. I have to say it made it even better. The texture went from smooth to velvet. Absolutely luscious. Thanks Ina!

Sunday, May 23, 2010

Vanilla Bean and Chocolate Mousse

Chocolate Box calls this recipe Chocolate and Vanilla Creams. That’s fine, but what does that mean? Its not whipped cream. And it’s not exactly mousse either because it’s not light and airy like mousse. But it deserves a suave name like mousse.

It looks like pudding but it’s much more decadent. It's heavier, dreamier, and more intense in flavor. Don’t expect it to be the same if you use vanilla extract. You must use a vanilla bean.


Chocolate and Vanilla Creams

2 cups heavy cream
1/3 cup sugar
1 vanilla bean
¾ cup sour cream
2 tsp powdered gelatin
3 tbsp water
2 oz. semisweet chocolate

Place the cream and sugar in a saucepan, then add the vanilla bean. Heat gently, stirring until the sugar has dissolved, then bring to a boil. Reduce the heat and simmer for 2-3 minutes.

Remove the saucepan from the heat and take out the vanilla bean. Stir in the sour cream.

Sprinkle the gelatin over the water in a small heatproof bowl and let it get absorbed, this takes about one minute. Then microwave the gelatin for 30 seconds on high heat. It should come out dissolved in liquid. Cool. Stir into the cream mixture. Pour half of this mixture into another mixing bowl.


Put the semisweet chocolate in a heatproof bowl over a saucepan of gently simmering water until melted. Stir the melted chocolate into half the cream mixture. Pour the chocolate mixture into four individual glass serving dishes and let chill for 20-30 minutes, until just set. While it is chilling, keep the vanilla mixture at room temperature.


Spoon the vanilla mixture on top of the chocolate mixture and let chill until the vanilla is set. Decorate with chocolate shavings.

Thursday, April 29, 2010

Whipped Cream – Two ways

Fresh, homemade sweetened whipped cream is far superior to cool whip or reddiwhip. It takes literally 10 seconds to make, so don’t eat that junk anymore.

You can make an easy, quick version in your blender to top off that ice cream or pie you’re about to eat:


Blender Recipe

1 cup heavy or whipping cream
1 teaspoon vanilla
4 tablespoons powdered sugar (the fresher the better)

Stir all ingredients in your blender and then blend for 10 seconds. Eat immediately, leftovers will melt but will still taste good!

Junior’s Decorator’s Whipped Cream

This recipe is from Junior’s Cheesecake Cookbook. The cream is stabilized with gelatin, making it easier to work with because it’s firmer- perfect for piping. You can use heavy or whipping cream, they usually taste the same but whipping cream tends to hold its shape a little better.

1 teaspoon unflavored granulated gelatin
1 tablespoon cold water
1 cup cold heavy or whipping cream
1 tablespoon sugar (I like to use 3 tablespoons powdered sugar instead)
1 teaspoon pure vanilla extract


Place the gelatin in a small heatproof bowl. Stir in the cold water, and let stand until it thickens- this usually takes about one minute. Cook the gelatin in the microwave on high for about 30 seconds until liquidy and melted. (Yes, it will smell.)

In a medium sized bowl, whip the cream with an electric mixer on high until it thickens and soft peaks just to begin to form. With the mixer still running, add the sugar and beat just until the cream stands up in peaks. Beat in the vanilla and melted gelatin until the cream stands up in peaks. Don’t over mix or the cream will curdle and look lumpy. Refrigerate for 30 minutes but not more than 1 hour. Use to fill or frost a cake. (I’ve used it immediately without chilling and it still stands up fine).

Tip: Only fill your pastry bag half full. This makes it easier to control while piping. Squeeze a little cream back into the bowl to get rid of pockets of air.  
 
Blog Installation and Coding by Designs by Linds 2011