


Tip: fudge makes a great gift! Especially in decorated boxes with pretty tissue paper.
Tuesday, December 9, 2008
Festive Fudge
Tip: fudge makes a great gift! Especially in decorated boxes with pretty tissue paper.
Tuesday, November 18, 2008
Three Layered Apple Cake
 Food network needs a show like Everyday Baking. And also one where they teach you how to make wedding cakes. As much as I like Ace of Cakes, they need to market more how-to’s. I'd watch it.
Everyday baking’s three layered apple cake is moist and delicious. It’s not a delicate cake- it’s hardy and filling. Anytime you see applesauce, pumpkin, or grated fruit in cake- you know it’s going to be moist, and have great texture. I didn’t try the brown sugar buttercream but I really need to because the sound of that flavor profile would fit perfectly for this cake. And it won’t be gritty because you cook the egg whites and sugar- so actually, it’s a brown sugar swiss meringue buttercream. Oh I need to try it.
Friday, November 7, 2008
Blackout Cake

Friday, October 31, 2008
Double Delicious Cookie Bars
Modifications: Trust me, look at the recipe. 4 cups of chips in one 13x9 dessert? Thats alot. It was really sweet. The 3 cups of chocolate chips overpower the 1 cup of peanut butter chips. Not balanced! So take my advice and distribute the chips in even portions: 1 cup of peanut butter chips and 1 cup of chocolate chips (half of it is going to be for the drizzle on top). These adaptations will please everyone- even a sweet tooth. Use only 1/2 teaspoon shortening.
I like how they tell you to melt your butter in the 13x9 pan in the oven as its preheating. No need to even dirty a bowl! These are so easy. Just don’t burn your butter. Oh, and they say to bake 25-30 minutes. What? Mine bake up in 18-20 minutes. And they taste amazing the next day!
Hershey’s also provides a variation to this recipe: just add coconut to make Chippy Chewy Bars. Those are great too.
Thursday, October 16, 2008
Reese's Marble Cheesecake
Saturday, September 20, 2008
Coconut Cake - Two Ways
After you watch Ina Garten make her coconut cake on the food network about five times, you finally decide its time to print out that recipe. But, you’ve also just discovered the show Everyday Baking and they’ve made a tasty looking coconut cake too. What to do? Try them both!
 Ina’s cake came out moist and dense with a very slight coconut flavor if any at all. It was still tasty, but was more like vanilla cake. The coconut flavor only comes through the garnish on top. Next time I'll follow the reviewer's suggestions and replace the milk for coconut milk. The frosting is a cream cheese buttercream which is to die for.
  Everyday baking’s coconut cake is a vanilla cake as well (no coconut in the batter at all) and comes out less rich than Ina’s but a little sweeter and definitely lighter. It was more crumbly (airy), but I’d still call it a dense cake. This recipe uses a lemon curd filling which I absolutely love. Both frostings were delicious, so it really just depends on your mood. Seven-minute frosting doesn’t have ANY flavor (try adding vanilla extract) but a wonderful, smooth texture. It’s much lighter and less sweeter than Ina’s cream cheese buttercream.


Thursday, September 4, 2008
Hershey's Special Dark Chocolate Layered Cheesecake


Friday, August 22, 2008
Black Forest Mini Cheesecakes
I tried both paper and foil liners. If you use paper, make sure you bake the cheesecake completely. It came out 100 times better in the foil liners (baked evenly and quicker) so I suggest using those. I also reserved a small amount of batter to try without cocoa, so it was flavored with just almond extract. It didn’t taste that good- they were bitter. Stick to the recipe!
You may be thinking of using cool whip instead of the sour cream topping. No! I liked the topping because the flavor stood up to the pie filling and cheesecake (I don’t think cool whip will add any new taste) and it made the dessert more rich and moist. Hey, it’s sour cream so it still has that coolness and lightness you’re looking for.
Monday, July 14, 2008
Martha Stewart Fudgy Chocolate Brownies
You have to watch her video to get her secret fudge sauce recipe. Oh wait, no you don’t, I will gladly post it for you. Look how nice I am.
Martha Stewart Fudgy Chocolate Brownies
Ingredients
1/2 cup (1 stick) unsalted butter, plus more for pan
8 ounces bittersweet chocolate, coarsely chopped
1 1/2 cups sugar
4 large eggs
1 teaspoon pure vanilla extract
3/4 cup all-purpose flour
1/2 teaspoon salt
Directions
Preheat oven to 350 degrees. Butter an 8-inch square baking pan or heatproof glass dish. Line pan with parchment paper, leaving a 1-inch overhang on 2 sides. Set aside. Place butter and chocolate in a large heatproof bowl set over (but not touching) simmering water; stir frequently until chocolate and butter are melted, about 7 minutes. Remove bowl from heat; let cool to room temperature, 10 to 15 minutes.
Stir sugar into cooled chocolate mixture until combined. Whisk in eggs one at a time, whisking until smooth after each addition. Whisk in vanilla. Gently fold in flour and salt.
Pour batter into prepared pan, and smooth top with an offset spatula. Bake until cake tester inserted in the center comes out with only a few moist crumbs attached, 40 to 45 minutes. Transfer pan to a wire rack to cool completely.
Run a knife or offset spatula around the edges of the pan. Using parchment, lift brownies out of pan and onto the rack. Transfer to a cutting board; cut into 2-inch squares.
Martha Stewart's Hot Fudge Sauce
1 cup heavy cream
½ cup light corn syrup
12 oz. semisweet chocolate chips (or high quality chocolate, chopped)
Directions
Combine the heavy cream and corn syrup in a sauce pan over low heat until bubbly. Add the chocolate and stir until combined. Remove from heat. Refrigerate leftovers.
Wednesday, July 9, 2008
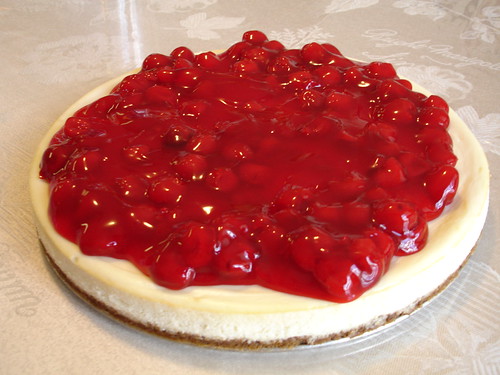
The Ultimate Cheesecake
Thursday, June 26, 2008
Apple-Ca-Dapple Crisp

Adapted from: Betty Crocker
Ingredients
5 large cooking apples (such as Rome Beauty, Granny Smith or Greening or a combination of these)
1/4 cup firmly packed brown sugar
1 teaspoon ground cinnamon
1/4 cup water
1 cup all-purpose flour
2/3 cup granulated sugar
1/2 cup (1 stick) butter, soft enough to spread (zap in microwave for 10 seconds if needed)
Vanilla Ice Cream or whipped cream, if you like
Directions
Heat the oven to 375 degrees F.
Peel the apples and cut into 1/3 inch slices. Discard apple core and seeds. Put apple slices in a 8 x 8 inch pan.
Combine brown sugar and cinnamon with a fork, in a small bowl. Sprinkle sugar mixture over apples. Pour the water over apples.
Combine the flour, granulated sugar and butter in a medium bowl. Start with a fork and then mix with your hands until the mixture is crumbly. Sprinkle crumbly flour mixture over apples.
Bake 45 to 55 minutes or until apples are soft and topping is golden brown. Cool for at least 10 minutes on a wire cooling rack.
Serve with ice cream or the whipped cream, if you like.
Friday, June 13, 2008
Chocolate Sour Cream Cake
Chocolate Sour Cream Cake
Adapted from: Hershey's
Ingredients
1 teaspoon vanilla extract
1 container (16 oz.) dairy sour cream
2 eggs
1 teaspoon salt
2/3 cup butter or margarine, softened
3/4 cup HERSHEY'S Cocoa
1-1/2 teaspoons baking soda
1-3/4 cups all-purpose flour
1-3/4 cups sugar
Directions
Heat oven to 350°F. Grease and flour 13x9x2-inch baking pan.
Stir together flour, sugar, cocoa, baking soda and salt in large bowl. Add butter, sour cream, eggs and vanilla; beat on medium speed of mixer 3 minutes. Pour batter into prepared pan.
Bake 40 to 45 minutes or until wooden pick inserted in center comes out clean. Cool in pan on wire rack. Frost. 12 to 15 servings.
Fudge Frosting
3 tablespoons butter or margarine
1/3 cup HERSHEY'S Cocoa
1-1/3 cups powdered sugar
2 to 3 tablespoons milk
1/2 teaspoon vanilla extract
Directions
Melt butter in small saucepan over low heat. Add cocoa; cook, stirring constantly, just until mixture begins to boil. Pour mixture into medium bowl; cool completely. Add powdered sugar alternately with milk to cocoa mixture, beating to spreading consistency. Stir in vanilla. About 1 cup frosting.
Thursday, May 15, 2008
Hershey's Chocolate Cheesecake – Three ways
 My three staple chocolate cheesecake recipes. They vary in chocolate intensity but all are amazingly good.
Chocolate Festival Cheesecake is not overly sweet but has great chocolate flavor. It uses cocoa powder, granulated sugar, and sour cream. A good combination for those who want chocolate but still want to taste the essence of cream from the cream cheese and sour cream in this cheesecake.
Okay, that was dreamy, but this final recipe will take you to chocolate heaven. If you need something divinely and insanely fudgy. Fudge Truffle Cheesecake. I think the name says it all. It uses semi-sweet chocolate chips instead of cocoa powder and sweetened condensed milk instead of sugar. Maximum richness and fudge flavor. From the fat in the chocolate chips, of course. And creaminess from the sweetened condensed milk. It doesn’t get any better. If you love dark chocolate, go with dark chocolate chips, but I like to use semi-sweet because it usually pleases everyone. As you probably would have guessed- this one is my favorite of the three.
All three use a chocolate crumb crust- which is mandatory.

Chocolate Festival Cheesecake
Crust
1-1/4 cups vanilla wafer or graham cracker crumbs
1/3 cup powdered sugar
1-1/4 cups vanilla wafer or graham cracker crumbs
1/3 cup powdered sugar
1/3 cup HERSHEY'S Cocoa
1/4 cup (1/2 stick) melted butter or margarine
Directions
Heat oven to 350°F. Combine first three ingredients in a medium bowl; stir in melted butter or margarine. Press mixture onto bottom and 1/2 inch up side of 9-inch springform pan. Bake 8 to 10 minutes. Cool.
Cheesecake
3 eggs
Sweetened whipped cream or whipped topping (optional)
2 tablespoons all-purpose flour
Assorted fresh fruit, sliced (optional)
3 packages (8 oz. each) cream cheese, softened
1-1/4 cups sugar
1/4 cup HERSHEY'S Cocoa
2 teaspoons vanilla extract
1/2 cup dairy sour cream
Directions
Set oven temperature to 450°F.
Combine cream cheese, sugar, sour cream, cocoa and vanilla in large bowl; beat on medium speed of mixer until smooth. Add flour and eggs; beat well. Pour into prepared crust. Bake 10 minutes.
Reduce oven temperature to 250°F; continue baking 30 minutes. (Cheesecake may not be fully set in center.) Turn off oven; leave cheesecake in oven 30 minutes without opening oven door. Remove from oven to wire rack. With knife, loosen cake from side of pan. Cool to room temperature; remove side of pan. Refrigerate several hours before serving. Garnish with chocolate curls or sliced fruit and whipped cream, if desired. Cover; refrigerate leftover cheesecake. 10 to 12 servings.
HERSHEY'S Tuxedo Chocolate Cheesecake
Crust
1-1/2 cups vanilla wafer or graham cracker crumbs
6 tablespoons powdered sugar
1-1/2 cups vanilla wafer or graham cracker crumbs
6 tablespoons powdered sugar
6 tablespoons HERSHEY'S Cocoa
6 tablespoons melted butter or margarine
Directions
Combine first three ingredients in a medium bowl; stir in melted butter or margarine. Press mixture onto bottom and 1 inch up side of 9-inch springform pan. Store in refrigerator until ready to use.
Cheesecake
1/4 cup (1/2 stick) butter or margarine
1/2 cup HERSHEY'S Cocoa
3 packages (8 oz. each) cream cheese, softened
1 can (14 oz.) sweetened condensed milk (not evaporated milk)
4 eggs
1 tablespoon vanilla extract
Directions
Heat oven to 300°F
Place butter in medium microwave-safe bowl. Microwave at HIGH (100%) 30 to 45 seconds or until melted. Stir in cocoa until smooth; set aside.
Beat cream cheese in large bowl. Add cocoa mixture; beat well. Gradually beat in sweetened condensed milk until smooth. Add eggs and vanilla; beat well. Pour batter into prepared pan.
Bake 1 hour and 5 minutes or until set. (Center will be soft.) Remove pan from oven to wire rack; loosen cake from side of pan. Cool completely; remove side of pan. To serve, garnish as desired. Cover; refrigerate leftover cheesecake. Garnish as desired. 12 servings.
Fudge Truffle Cheesecake
Crust
1-1/2 cups vanilla wafer or graham cracker crumbs
1/2 cup powdered sugar
1-1/2 cups vanilla wafer or graham cracker crumbs
1/2 cup powdered sugar
1/3 cup HERSHEY'S Cocoa
1/3 cup melted butter or margarine
Directions
Combine first three ingredients in a medium bowl; stir in melted butter or margarine. Press mixture onto bottom and 1 inch up side of 9-inch springform pan. Store in refrigerator until ready to use.
Cheesecake
2 cups (12-oz. pkg.) HERSHEY'S SPECIAL DARK Chocolate Chips or HERSHEY'S Semi-Sweet Chocolate Chips
3 packages (8 oz. each) cream cheese, softened
1 can (14 oz.) sweetened condensed milk (not evaporated milk)
4 eggs
2 teaspoons vanilla extract
Directions
Heat oven to 300°F.
Place chocolate chips in microwave-safe bowl. Microwave at MEDIUM (50%) 1-1/2 minutes; stir. If necessary, microwave at MEDIUM an additional 15 seconds at a time, stirring after each heating, just until chips are melted when stirred.
Beat cream cheese in large bowl until fluffy. Gradually beat in sweetened condensed milk until smooth. Add melted chips, eggs and vanilla; mix well. Pour into prepared crust.
Bake 1 hour and 5 minutes or until center is set. Remove from oven to wire rack. With knife, loosen cake from side of pan. Cool completely; remove side of pan. Refrigerate several hours before serving. Garnish as desired. Cover; refrigerate leftover cheesecake. 10 to 12 servings.
Saturday, May 3, 2008
Lime Squares with Pistachio Graham Cracker Crust

Watching this episode of "Everyday Baking" with my sister was very entertaining because John Barricelli has a New York accent. We have never called these lime squares. They are “lime sqways.”
This creamy dessert is a cross between Key lime pie and traditional lemon bars. However, the pistachios added to the crust make it amazing! Who knew those two green foods complimented each other so well!
Lime Squares with Pistachio-Graham Cracker Crust
4 tablespoons (1/2 stick) unsalted butter, melted
2/3 cup shelled pistachios
3/4 cup graham-cracker crumbs
3 tablespoons sugar
1 tablespoon grated lime zest (the zest of 2 limes)
2 large egg yolks
1 can (14 ounces) sweetened condensed milk
1/2 cup fresh lime juice (about 5 juicy limes)
Directions
Preheat oven to 350 degrees. Line the bottom of 8x8 inch pan with parchment paper, leaving a 2-inch overhang on all sides.
In a food processor or blender, finely grind pistachios and graham-cracker crumbs, you may need to do this in a few batches in a blender. Then combine together in a bowl, along with sugar and zest. Add in melted butter. Instead of a bowl, you can combine everything in the food processor if you are using one. Reserve 1/4 cup mixture. Press the remaining mixture into bottom of prepared pan. Bake until lightly browned, 8 to 12 minutes. Cool crust, 30 minutes.
To make the filling: In a large bowl, whisk together egg yolks and condensed milk. Add lime juice; whisk until smooth. Pour filling into cooled crust; carefully spread to edges. Use reserved crumb mixture to sprinkle over the top.
Bake until set, about 15-22 minutes. (I needed 22 minutes). Cool in pan on rack; then chill at least 1 hour before serving. Using parchment paper overhang, lift out of pan, and transfer to a cutting board.
With a serrated knife, cut into 16 squares, wiping knife with a damp kitchen towel between each cut. Store in refrigerator, cover with plastic wrap.
Monday, April 14, 2008
Cherry Pie with Lattice Top Pie Crust

Sandra Lee, you make things easy- thanks for this recipe. It’s my favorite berry pie that you can make in 5 minutes if you have a pre-made crust. You can use cherry or strawberry pie filling as the base- which gives us our sweetness and gooey sauce. By adding the frozen berries (blueberries, raspberries, blackberries, strawberries) we get that tartness to balance the flavors making it taste like a fresh berry pie. Don’t worry about adding the grape/apple juice, I tend to skip that, but if you have it on hand, go for it. One bite makes you think its summer time. Tastes unbeatable when slightly warmed from the oven and topped with a scoop of vanilla ice cream.
Here’s the pie crust recipe I make to go along with it- one of the best pie crust recipes I’ve found. It has 5 stars and 356 reviews. It rolls out easily and bakes up flaky but keeps its shape. I make it in my food processor- once it forms into a ball its ready and perfect. Cook the bottom crust before you add your filling (and top crust) so it doesn’t come out soggy or raw. You can also make a pretty lattice top which tastes great with your ice cream.

Pie Crust IV
Recipe from Jan Bittner at Allrecipes.com
1/2 cup vegetable shortening
1 1/2 cups all-purpose flour
1/2 teaspoon salt
1/2 cup cold water
Directions
Mix shortening, flour, and salt together with a fork or a pastry blender until very crumbly. Add as much water as needed to hold together, and mix lightly with a fork.
Roll gently on a floured pastry cloth to about an inch larger than pie plate. Fold carefully in half, lift to pie plate, and unfold. Press into pan. For a single-crust pie, trim with a small knife to about 1/2 inch beyond rim. Fold up, and pinch so edge of pie is raised from rim.
Cherry Pie
Recipe adapted from Sandra Lee
1 can cherry pie filling
12 ounces frozen mixed berries, drained
1 tablespoon juice (apple, cherry, etc) or water if N/A
1 box ready made pie crust or above recipe
Flour, for dusting
1 egg, lightly beaten
1 tablespoon sugar
Directions
Preheat oven to 375 degrees F.
In a large bowl, combine cherry pie filling, mixed berries and kirsch. Set aside.
Gently unfold bottom crust onto floured pie dish. Pour berry filling into unbaked crust. Using a pie pan as a guide, cut a circle for the top crust from a sheet of pie crust. Use a lattice cutter to create a pattern, and generously flour each piece so that pieces of lattice do not stick. Top pie with lattice strips and flute the edge of the pie with a fork. Brush top crust with beaten egg and sprinkle lightly with sugar. Bake for 40 minutes, or until bubbling appears in the middle of pie. Cover pie with aluminum foil halfway through baking. Let sit for 20 minutes before serving.
Thursday, March 20, 2008
Lemony Cheesecake Bars

Friday, February 1, 2008
White Chip Lemon Streusel Bars
Ingredients
- 1 can sweetened condensed milk (not evaporated)
- 1/2 cup lemon juice
- 1 teaspoon freshly grated lemon peel
- 2 cups HERSHEY'S Premier White Chips
- 2/3 cup butter or margarine
- 1 cup light brown sugar
- 1-1/2 cups all-purpose flour
- 1-1/2 cups regular rolled or quick-cooking oats
- 3/4 cup pecan pieces
- 1 teaspoon baking powder
- 1/2 teaspoon salt
- 1 egg
- 1/2 teaspoon shortening
Directions
1. Heat oven to 350°F. Lightly grease 13x9x2-inch baking pan. Combine sweetened condensed milk, lemon juice and lemon peel in medium bowl; set aside. Measure out 1/4 cup and 1/3 cup white chips; set aside. Add remaining white chips to lemon mixture.
2. Beat butter and brown sugar until blended in large mixer bowl. Stir together flour, oats, pecans, baking powder and salt; add to butter mixture, blending well. Remove 1-2/3 cups oats mixture; set aside. Add egg to remaining mixture, blending until crumbly. Press egg/crumb mixture on bottom of prepared pan. Gently spoon lemon mixture on top, spreading evenly. Add reserved 1/3 cup white chips to reserved crumb mixture. Sprinkle over lemon layer, pressing crumbs lightly.
3. Bake 20 to 25 minutes or until lightly browned. Cool in pan on wire rack. Place remaining 1/4 cup white chips and shortening in small microwave-safe bowl. Microwave at MEDIUM (50%) 30 seconds; stir. If necessary, microwave at MEDIUM 10 seconds at a time, stirring after each heating, until chips are melted and mixture is smooth when stirred. Drizzle over bars. Allow drizzle to set; cut into bars. Makes 24 to 36 bars.
*To toast pecans: Heat oven to 350°F. Spread pecans in thin layer in shallow baking pan. Bake 7 to 8 minutes, stirring occasionally, until golden brown; cool.
Friday, January 25, 2008
"The Chewy" Chocolate Chip Cookies

One of the first episodes I've seen of Good Eats features these cookies. Cookie Monster’s brother teaches you how to make them. Chewy, heavy, cakey, puffy, big, golden chocolate chip cookies and these always hit the spot. Just one of the secrets to this recipe, among others, is the bread flour. Found this recipe five years ago and still love it.

Incase you watch that episode- I tried the puffy chocolate chip cookie recipe but they didn’t come out puffy at all. They were exactly like crunchy, flat Chips Ahoy cookies. He should rename it to The Crunchy.
"The Chewy" Chocolate Chip Cookies
8 ounces unsalted butter
12 ounces bread flour
1 teaspoon kosher salt
1 teaspoon baking soda
2 ounces granulated sugar
8 ounces light brown sugar
1 large egg
1 large egg yolk
1 ounce whole milk
1 1/2 teaspoons vanilla extract
12 ounces semisweet chocolate chips
Directions
Melt the butter in a 2-quart saucepan over low heat. Set aside to cool slightly.
Sift together the flour, salt and baking soda onto a paper plate. Pour the butter into your stand mixer's work bowl. Add the sugar and brown sugar and beat with the paddle attachment on medium speed for 2 minutes.
Meanwhile, whisk together the whole egg, the egg yolk, milk and vanilla extract in a measuring cup. Reduce the mixer speed and slowly add the egg mixture. Mix until thoroughly combined, about 30 seconds.
Using the paper plate as a slide, gradually integrate the dry ingredients, stopping a couple of times to scrape down the sides of the bowl. Once the flour is worked in, drop the speed to "stir" and add the chocolate chips. Chill the dough for 1 hour.
Preheat the oven to 375 degrees F and place racks in the top third and bottom third of the oven.
Scoop the dough into 1 1/2-ounce portions onto parchment-lined half sheet pans, 6 cookies per sheet. Bake 2 sheets at a time for 15 minutes, rotating the pans halfway through. Remove from the oven, slide the parchment with the cookies onto a cooling rack and wait at least 5 minutes before devouring.
Notes
The darker the sugar you use, the chewier your cookies will be.
Subscribe to:
Posts (Atom)


